

A Complete Guide to Writing on Wrighting
- Wrighting Hub

- Aug 1, 2021
- 6 min read
Updated: Aug 16, 2021
Welcome to Wrighting, the place for writers to come together and form a community for readers to get inspired.
There are several features on this site, and this guide is here to make your life easier!
Let's Get Started!
Why Should I Be A Site Member?
Without a membership, you can read the articles on the site, but you cannot comment, interact, chat with other writers, or write yourself.
Logging in as a member is completely free of cost and you can have access to all the benefits mentioned above. To log in as a member all you have to do is to click on the "Log In" button on the top right corner of the screen as outlined by the red box below:

When Will I Become A Blog Writer?
After signing up as a site member, you will receive an email in your inbox within a few hours with an invite for being a blog writer. You will have to accept that invite and will be redirected to a page telling you to create an account with Wix as below:

After creating an account, you will see something like this:

After this, you can come back to our site and you will see that you have been added as a writer. Now you can create your post and do many more things.
Creating a Post?
To create a new post on our site you can click the 'Create a Post' button at the top right of the Blog Page or an Article's Page. Or you can find this option under your profile.

To 'Save as a Draft,' you will have to click the three dots at the bottom of the post and choose this option, once you do these changes will automatically get saved which can be accessed later or can be published at that time.
To share your article click the three dots on the top of your published post and choose the share option or at the bottom of the post, there is another menu with different social platforms on which you can share.
How To Access My Member's Page?
To access your personalised member's page you have to click on the drop-down menu next to your login bar as shown below:

Once you get the drop-down menu click any of the options and you will be redirected to your member page which looks like the page as shown above. To make your member page more personalised, you can upload your banner photo as well as a profile picture.
Making Your Profile Public?
Making your profile public is very important for accessing members chat on our site as well as writing posts. To make your profile public go to your member's area and click the 'Make Profile Public' option towards the left side of your profile banner as shown below:

How To Edit Your Profile?
To edit your profile click the 'Edit profile' option on the left side of your profile banner. You can then write a short bio about yourself and also edit how your profile name appears to everyone else.
Also, under your profile, you can write a short description of yourself.
How To Access Drafts, Delete Them And Edit A Published Post?
To access drafts you will find an option called 'My Drafts' in your personal member area. Click on it and start writing.
To delete the draft, when you go to the 'My Drafts' section under your member's area you will see three dots. Click on them and choose the option 'Move to Trash' and your draft will be deleted as shown:

To edit a published post, click on the 'Blog Posts' tab in your member's area. Upon clicking the post you wish to edit, you will be redirected to your post page. There will be three dots at the top right of the post where you will see a list of options. Click on the 'Edit Post' option and you will then be able to edit your post.

How To Like Or Comment On A Post?
To like a post, go to the bottom of the page and click the heart. To comment on the post, at the bottom of the page you will find a box with the text written 'Write a comment...' Over here, you can write your comment as seen below:

How To Turn Off Commenting And Delete A Comment?
To turn off commenting go to your published post, click the three dots at the top right and choose the option 'Turn Off Commenting.'
If someone writes an unruly comment or a comment that you do not like on your post, go to that post and click the three dots next to the comment and choose the option of 'Delete' as shown below:

If you like the comment you can click the heart or can also reply to it.
How To Delete A Published Post?
To delete a published post click on the 'Blog Posts' tab in your member's area or directly click on the post you want to delete. Upon clicking the post you wish to delete, you will be redirected to your post page.
There will be three dots at the top right of the post where you will see a list of options. Click on the 'Move to Trash' option and you will then have your post will be deleted as shown:

How To See My Notifications?
To see your notifications, you just have to go to your member's area and click the 'Notifications' option or just click the bell icon at the top right side of your screen, next to your profile picture as you can see:

How Do I Set A Custom URL For My Profile?
To personalise your experience, there is an option to customise your profile URL. To do this you will have to go to your member's area and click 'My Account.'
After this go down and you will find 'Account Settings.' Under this, there is an option called 'Your Community Page URL' click this option and you will see an option called 'Edit URL.' as shown:

Once you do this, a box will pop up in which you can type your name or anything you want to be a part of your URL and click the 'Save' button to make it your URL as shown below:

Note: If the URL is already taken or is not valid, instead of showing a tick it will show a red cross in the text-box and you will have to type something else.
How To See My Followers And Who I Am Following?
To see your followers or a list of people you are following, go to any of your member pages and at the banner, you will see two options- 'Followers' and 'Following.' Click on these options and you can see the list of your followers or people you follow as shown:

What Are Post Settings?
When your post is a draft you can access the post setting by clicking that option at the top right corner of your post. For a published post to access your post settings click on the edit option and then click on 'Post Settings' as shown:

Once you do that, you will get three options namely- 'General,' 'Categories,' and 'SEO.'
Under General, you can add an excerpt explaining what your post is about. You can also add a cover image which will be shown in the post snippet or chose an option of not displaying a cover image. Finally, click the 'Save' option to save the changes you made.
How To Choose Categories For Your Post?
Once you reach the post settings you can click the 'Categories' option and a list of categories will be shown. Choose a few of these which fit with the theme of your post as shown below:
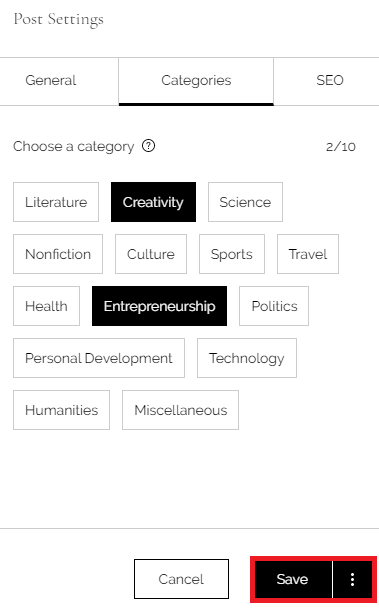
Choosing categories helps to make it easier for readers to find your posts and help them rank on google search. After choosing the categories click the Save option.
Working On SEO?
To rank your articles google search, working on SEO is a good option. To access SEO settings go to 'Post Settings' and click the 'SEO' option. Then, write the ending of the of your post URL relevant to your post. Then, add the title that will appear on search engines and add a description of what your post is about. Click the 'Save' option and you are good to go.
All About Writing A Post
There are many things available on our site to make your post more engaging and easier for readers to enjoy them. This section will help you understand how to utilize these features in your post.
After clicking the 'Create a Post' button you would see something like this where the journey of writing your post begins.

Editing The Text Of Your Post.
Changing The Size Of Text-
To change the size of text, highlight the text and upon doing so a menu bar with a wide range of options are seen as shown:

Click the option showing 'Paragraph' which is the default size of text. Then you can choose either 'Heading 2' which is the size of a subtitle, or you can choose 'Heading 3' which is a smaller size usually used as subheadings within the blog post.
Changing Colour, Highlighting Text-
To change the colour of the text click the image with a capital 'A' with a droplet at the bottom and choose from the wide range of colours or make your own custom colour by click the '+' button and choose by with the pointer or by typing the Hexadecimal. To Reset it to its normal colour click 'Reset to default' option.
Similarly for highlighting click the bucket picture and choose the colour or add a new colour. For resetting the default colour click the 'Reset to default' option as you can see:

Quoting Text-
To Quote text click the double quotes in the menu bar and your text will look something like this:

For any more queries contact us at:
Join our Discord server and talk with other creators:


Comments